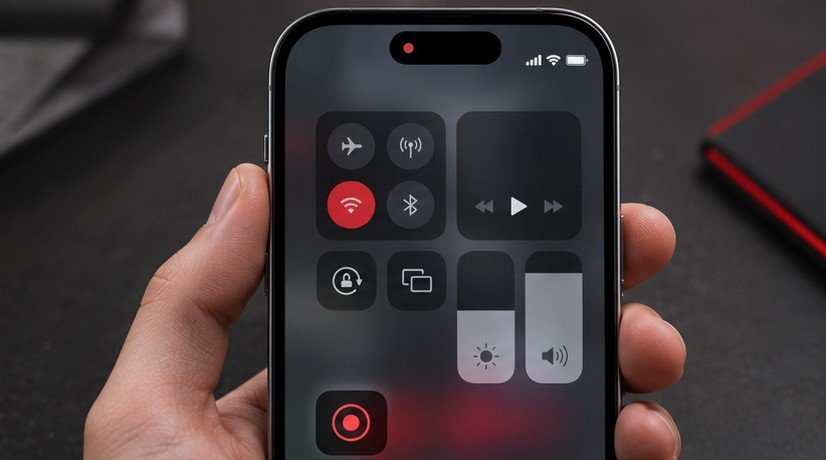
The iPhone Screen Recording control captures what happens on the display and saves the recording to Photos. Open Control Center, start a recording and wait for the countdown before performing the steps you want to show. If you need spoken narration, open the recording control’s expanded options and turn on the microphone before starting. Make a short sample first and play it back. A quiet sample can reveal whether you captured the expected audio, and a private test helps you catch notifications or account information you would rather keep out of the finished video.
Find the control and make a short test
Open Control Center using the gesture for your iPhone. Look for the Screen Recording control, which uses a circular recording symbol. If it is missing, add it using the Control Center customization available on your iOS version. Tap the control and wait for the recording countdown. Close Control Center and perform one simple action, such as opening a harmless settings view and returning to the Home Screen. Follow Apple’s screen recording instructions for controls specific to your version.
Stop recording using the on-screen recording indicator or by toggling the recording control in Control Center. Open Photos, locate the latest video and play it from the beginning. Verify that the content starts before the action you intended to show and ends after the result. If the first few seconds show Control Center or the video spends too long on a loading screen, trim that material in Photos if convenient or make another take. The first test is a way to learn the controls without making the final clip more complicated.
Decide whether to include your voice
For a narrated demonstration, touch and hold the Screen Recording control and inspect the microphone option. Turn it on if you want the iPhone to pick up your voice or other sounds nearby, then start the recording. Speak a short sentence at your normal distance and play it back. Check that the words are understandable beside any app sounds. If you record near a fan or in a larger room, compare two positions with the same sentence. Use the position that gives you a clearer voice without changing the way you need to hold the phone.
For a clean visual demonstration, keep the microphone off if you do not need narration. Check the exported example anyway, because app audio and microphone audio are separate questions. Some apps may prevent recording of their content or audio. Test the exact screen you plan to show with harmless sample content before committing to a long take. If a section is intentionally protected, use an authorized alternative such as a description of the menu or material your audience is allowed to see.
If you need to show a clip to someone without sending the original audio, plan the delivery while you record. You can include a text explanation alongside the video or use an editor with suitable audio controls before sending a copy. Play that copy before sharing. The recording in Photos and the file you actually attach may have different audio or timing after editing. For a related desktop workflow, our Steam gameplay recording guide covers reviewing sound and clip boundaries before export.
Make a clip someone else can follow
Write down the action and result you want the viewer to see. Instead of recording every menu you explored, start from a familiar point and perform the smallest set of steps that demonstrates the task. Pause briefly at important choices so the viewer can read them. If you intend to explain navigation with audio, say which control you are about to use and then tap it. When you review the clip, imagine watching it on another phone and check that the important labels are large enough to read.
For a bug report, show enough of the screen before the failure to explain how to reproduce it. Keep the error visible long enough to read. If a label contains private information, use a test account or reproduce the sequence with sample values where possible. Check the status bar, notification banners and app-switching view for details that could appear unexpectedly. If your recording concerns a shortcut, our iPhone personal automation guide can help you build a test that separates a trigger failure from an action failure.
Review the recording before sending it
Open the video and check its first few seconds, the important step and the end. If you only need the middle, open the available Photos edit controls and trim the start and end. Consider keeping the original if you might need to change the cut later. Play the edited clip as a recipient would. Look for a meaningful starting screen, a readable result and a clean end. If the video still includes irrelevant menus, recreating a short clean take may take less time than editing around them.
Choose a delivery method that fits the audience. A short clip may attach directly in a message, while longer footage can require a different route. If you share a copy through a messaging service, open or preview the shared version and check whether any compression made small text hard to read. Send the simplest explanation that still enables the recipient to do the task. If a screenshot communicates the same information, send the still image or pair it with the video for the step that needs motion.
Troubleshoot a recording that is missing or silent
If the video does not appear, confirm that recording started after the countdown and that you stopped it normally. Check Photos and available storage. Make a second test from a basic screen. If the recording appears there but fails inside one application, focus on the app or content rather than repeatedly changing the system control. Review any restrictions the device owner or administrator applied if the control is unavailable everywhere.
If the recording has no voice, open the expanded recording control and confirm the microphone is on for the new test. Try a short recording with no other activity and check whether the narration is audible. If your voice is present but hard to hear in an app demonstration, pause between important steps and talk closer to the microphone. Record another ten seconds before attempting a longer session. If the recording includes audio you did not expect, stop and adjust the input before creating another copy.
Frequently asked questions
Can I record without speaking?
Yes. Leave the recording microphone off and play a sample afterward. Check whether the apps you use supplied any audio and whether that audio is suitable for sharing.
Where does the recording go?
Look in Photos after stopping the recording. Find the newest video or the screen recording collection if available. A short trial makes it easy to recognize the intended clip.
Why is one app blank in my recording?
Some apps and content restrict capture. Compare with a recording of a basic screen to confirm the feature works on the device. Follow the app provider’s available options for sharing that material.
How do I make small controls easier to see?
Pause on the relevant page, consider a large label or an accompanying screenshot, and view the finished file on a phone before sending it. Check text after compression if you plan to use a messaging app.